Many people think that more expensive means better... maybe so in some cases but not necessarily true when it comes to buying beauty and grooming products.
For a long time I've made my own face creams and other concoctions like hair rinses, hair masks, bath oils and so on mainly not out of necessity but because I wanted products which were purer and without additives or harsh chemicals.
And after this long hard winter we've just had my face is in dire need of attention!
Feeding your skin can be easily done with something as simple as mashing avocado, honey and essential oil together which makes a refreshing face mask or for tired hair rinsing your mane with a bottle of stout is a magical treat!
By rinsing your hair with stout in addition to adding B vitamins, the proteins found in malt and hops are said to repair damaged hair and boost the overall body of your neglected locks. Also the maltose and sucrose sugars in beer tighten the hair's cuticles so expect an enhanced shine like that of the wig of a Hollywood superstar... It's true!
Scrambling around in the Craft Guerrilla cupboards we found everything we needed and I'm sure you'll have some of this stuff in your homes too... Maybe not the green clay but I implore you that if you haven't some already to invest in it...it's a really good staple for so many treatments!
And because we love making our own so much here's the recipe for our latest home beauty fave... detoxing face mask! In the words of Mrs. Doyle "Go on, go on, go on" Give it a try!
 |
| Cupboard love! Inexpensive ingredients that you might have in your home... |
A very important note: Because the clay draws out any impurities your face may go red and blotchy - mine did- so if you're planning a big date, job interview etc... do this at least 4 hours before your big meeting or preferably the day before!
Ingredients:
1 large heaped table spoon of fine green clay
Essential oil, you can use one suitable for your skin:
normal 1 to 3 drops of Lavender essential oil
greasy 1 to 3 drops of lemon or grapefruit essential oil
dry 1 to 3 drops of Mallow Leaf or Sandalwood essential oil
1/2 tsp of honey
1/2 tsp rose water
Pulp or gel of a freshly cut Aloe Vera leaf - if you have any available, we have a monster of a plant!- or a tea spoon of olive oil
distilled water
(NOTE: this will make a large amount so if you want to keep it for a week or so add one teaspoon of citric acid, a drop or two of vitamin E and store in the fridge... better still share with a girlfriend or a family member!)
Utensils you'll need:
1 wooden or plastic spoon (metal reacts with the clay therefore diluting the potency of the clay)
1 ceramic or plastic bowl
1 large soft bristled brush
1 soft brush to buff the skin prior to treatment
Here's how...
Mix all the ingredients together to form a silky and smooth paste which should resemble cake batter. Add the water a little at a time as you don't want it too runny.
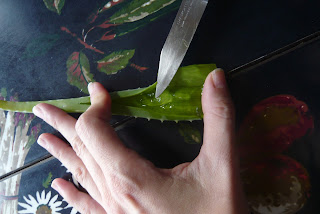
*Extracting the Aloe Vera gel can be done by scrapping the inside of the tender leaf... it does resemble snot but it is absolutely amazing stuff!
Plus you can keep any unused leaves in the fridge as long as the cut part of the steam is covered with a paper towel or cling film. If you don't have an Aloe Vera plant you can use as stated previously olive oil instead!
 |
| Fresh Aloe Vera Gel extracted from leaves of a mature plant! Ours came from Spain as a little bub. It's now 18 years old and growing! |
 |
| Scrape out the "gel" with a sharp knife... |
Before you start treatment...
Massage your face with a soft brush (a baby's hair brush is awesome but a tooth brush you keep solely for your skin can be just as good) this will wake up your cells and get your system ready to receive the healing face mask!
Now you're ready to start the fun part...
 |
| This is the consistency you're aiming for...almost like melted chocolate or cake batter! |
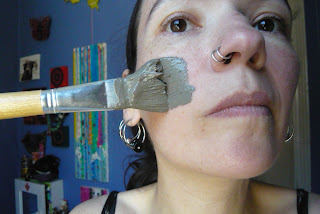
Apply enough clay to your face- paint it on generously- but avoid the eye and lip area. You should have an even coverage but don't be tempted to layer it on too thick!
 |
| Paint it on! |
 |
| Try not to speak or laugh... the lesser cracks the better! |
 |
| For an extra bit of love get those cucumber slices on your eyes, sit back, relax and enjoy! |
P.S.
My skin went super red -as you can see- but it was clear and glowing plus the redness went down pretty quickly... it had been a while since the last time I did a face mask so my skin was in terrible need of a "deep cleansing".
Your face shouldn't go red because of the clay but it's usually down to the toxins and/or can be hormonal.
It has been known that even people with normally "great" or "flawless" skin get breakouts after green clay face masks so don't fret... it's nothing bad or permanent it's just your skin getting rid of any horrible nasties from your body!


