Friday, 14 December 2012

Happy holidays and looking forward to a new year!

Happy holidays everyone, we hope you've had an awesome year filled to the brim with crafty magic!
This year has been an interesting one... not always great but filled with life lessons which we can take away and learn from. It's all part of life and our experiences make us stronger and more in tune with what we actually want to do with Craft Guerrilla.
And so we've decided that things need to evolve and change plus we need to bring you a lot more so we can still function within our selves and as part of the growing London craft community. Plus we need to keep Craft Guerrilla independent but self sufficient!!!

A lot more in the way of posts/content will be added so our beautiful blog becomes more of a resource, a place of learning and above all somewhere you'll want to explore and stay for a while.
More pages are being added including a resource page where you can find great people/companies who can help you on your crafty travels.
We want you to make, bake and take away something which is of value...and not just a blog which is a great read! Yes recipes and tutorials are good but we know that for example sometimes trying to take your craft to the next level can be a struggle. There seems to be a world of information out there but sometimes it's hard to see the wheat from the chaff!

Our blog is pretty much an extension of our zine and if you've read it you might have noticed that we don't just cover craft. Oh yes we love cake baking, cocktail making, DJ-ing and finding great new design talent! Oh yes we're keen craft magpies and love hunting out all those shiny nuggets of creative awesomeness.
Speaking of which we're also looking into adding to our "guerrilla shop" and feature more designer maker products direct to the buying public. It's still a way away but it's in the pipeline!!!

We've been so lucky to work with lots of seriously talented people... "OK Jo" of Soupa Creatives was one of them and she created this fab cover for us!

In the new year we will be adding to the blog so it's a bit more like our zine which by the way you can purchase in our Guerrilla shop on our web site.
Keep your peepers peeled because we're on a mission... so if you'd like to contribute get in touch!
Please send us an example of your writing and a short bio of yourself plus why you'd like to work with us. Also if you'd like to submit any craft tutorials, recipes or be part of our resources page let us know what you can offer.
Unfortunately writing content and tutorials is an unpaid position but it's a great opportunity to get your writing and projects out there under the Craft Guerrilla umbrella.



Wednesday, 12 December 2012

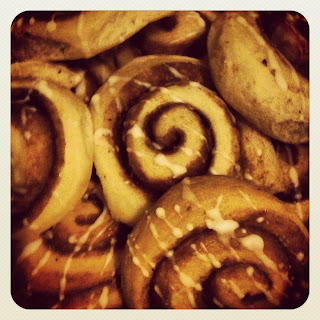
"Kanelbullar" ...my current obsession!

I love Swedish cakes and these are my current obsession...once you've tried making them you'll know why! They are super easy to make and most importantly they are delicious!
So without further ado here is the best ever recipe for Swedish "Kanelbullar" that I've ever found. They yield a large number so what I did was half the recipe though as it takes 1 egg I left it as it is IE 1 egg and it was fine...all other ingredients where halved and the result perfect!


"Kanelbullar"
Scandi Kitchen recipe:
Makes around 40 buns
For best result, don’t be stingy with the filling and don’t try to use low fat anything: whole milk, good quality butter... 
We also prefer using fresh yeast, but if you can’t get hold of any, you can use dried. NOTE:Replace fresh yeast with 2 x 7g sachets of the instant dry yeast – and add this to the flour/dry ingredients and NOT to the wet mix. 
If you are new to cinnamon buns, don’t worry: there is a lot of cinnamon in these – and ground cardamom. You can hold back a bit if you are not sure you’ll like it as strong as we do – but remember... they’re called Cinnamon Buns for a reason.

The dough
50 g fresh yeast
1000 g plain bread flour
85 g caster sugar
1 egg
150 g unsalted butter
500 ml whole milk
½ tsp salt
1 tsp ground cardamom (optional).
Filling
150g butter (nice and soft)
4-5 tsp ground cinnamon
85 g sugar (we like to use brown sugar)
Decoration
1 egg for brushing
Around 100 g of pearl sugar for decoration or drizzle over a thick icing sugar and water glaze...I actually prefer this to the pearl sugar!
 
This is how you do it
Melt the butter and add the liquid (milk) – check the temperature (should be between 37-46 degree Celsius for optimal yeast).  Add the yeast and stir.
Once the yeast has dissolved, add the egg, sugar, salt, cardamom and most of the flour (hold a bit back for kneading, about a large hand full). Work the dough until it stops sticking and has a shiny surface – probably around 10 minutes by hand. Keep kneading, it makes for a better bun.
Please the dough in a nice warm place for around 30 minutes or until doubled in size. Place the dough on a floured surface and work through the rest of the flour. I actually used a large floured melamine tray so to contain the mess!
Cut the dough in half and roll out each piece in a rectangular shape, around 30 cm long and 12-15 wide. Butter the whole piece liberally and dust over with the cinnamon and sugar. Roll each piece lengthways so that you end up with a long sausage looking roll. Cut 2 cm big bites and place them carefully on baking trays (take care to keep them separated as they will rise).  
Let the buns rest for another 30 minutes until doubled in size.  You should get between 34-40 buns out of this batch.
Brush gently with egg and pour over a bit of pearl sugar on each bun and then bake in the over on 220 degrees (fan oven) for about 8-10 minutes (turn the heat down a bit half way if you feel they are getting too brown). Let them cool down under a clean tea towel – this will stop them going dry immediately.
If you are using an icing sugar glaze (which I've been told the Norwegians prefer) allow the buns to cool before drizzling!

Enjoy!!!

PS You can always freeze them and defrost by gently heating in the oven as they are best served warm. 
If you make a whole batch I doubt you'll have any left over but freezing is great especially if you need to have them on hand for a quick sugar rush! 


NOTE:
I found fresh yeast in the Polish shops. Very inexpensive (about 40p per pack and you'll get at least 2 servings from it) and it's great quality.

Monday, 10 December 2012

It's never FELT so good...

Needle felting is both a relaxing and a creative craft form loved by many and misunderstood by some. Contrary to belief it's not just for making beads or components for other projects nor is it all about naff poorly made dust collectors. I've seen a few of those but in general the majority of needle felting I've seen has been pretty amazing!

Amazing dogs felted by Gai: http://www.gaizymaimake.co.uk/gallery/
Mushrooms: http://kathrynivy.com/patterns/free/myriad-mushrooms/

Milo & Ben: http://www.etsy.com/shop/MiloandBen?ref=seller_info


So it's "relaxing" you ask? It's much more then that...I believe this discipline can help you release your inner sculpture or sculptress!
Yes, it does help reduce stress as there's a lot of stabbing but I see it as a form of sculpting and not just in the way you create the 3D pieces but also in the method used, in the squeezing, forming with your fingers and building up of the piece. In a way it's a bit like clay yet softer and drier...plus a lot less messy!

There is a massive array of roving, lots of colours, textures and types. That's what you call the main material...it's also used to make yarn so it's pretty much the wool before it's been spun!
I use a lot of the "basic" roving though I have used the heavier stuff which is made form different type of wool. Just like in knitting yard you'll have different types and weights: angora, sheep wool etc.
Sourcing your materials is easy as there are quite a few on line retailers. I've used Forest Fibers which are really helpful and will be happy to guide any novices if you ring them for advice. There are also different needle gauges. This blog post was an invaluable resource: http://sarastexturecrafts.wordpress.com/2009/12/19/dry-needle-felting-needle-gauge-choice/

Wool-in-legends: http://www.etsy.com/shop/woolinlegends?ref=seller_info

I discovered needle feting because of Charlotte Haines-Lyon who's a master and an artist. I watched in amazement as she took a hand full of what looked like candy floss and then made it into an actual 3D object. I was hooked (pardon the pun)! She's one clever lady and she's also an inspiring teacher. Because of her I started experimented with felting and have gone from making simple shapes like mustaches to more intricate birds and even miniature cat portraits made form cat fur... Now, now don't judge cat fur is actually cleaner then sheep fleece and yes these portraits were made from the actual cat's hair! Cats, especially Persians are great for harvesting fur and just like angora which is rabbit fur it's a really great material to felt.


Below is a little bird I made for a workshop back in August... If you'd like to make one we have a few kits ready to purchase. £6.50 includes all materials, illustrated instructions and postage (UK only. Please contact us for international postage when ordering).
Email us your order via our address...


For basic instructions on how to get started on needle felting visit:
http://www.themagiconions.com/2011/02/tutorial-needle-felted-toadstool.html 

Otherwise search for online tutorials on "You Tube" as there are quite a few!


Here's a fun felting with cat fur book which I absolutely love...

By Kaori Tsutaya
And my own cat fur felting experience...

The beautiful Jassie Mo and her mini self

Sunday, 9 December 2012

Watch out Selfridges you have competition!

I loved working on the shop window and the best part of it was that I could pretty much do all sorts of experimental things and create something which I had in my mind for ages!
Fortunately the guys at Black Duke & Cashman have faith in me and let me loose in their beautiful shop...though the snow machines haven't been used like I had imagined but hey...we'll have snow soon enough!
Black Duke & Cashman formerly "Beyca Retro" has undergone a bit of a revamp...not only has it had a complete overhaul and a brand new name it now has a very lovely coffee bar which serves "Nude" coffee in the Aeropress coffee system. It also serves artisan baked cake on the weekend plus it has us there nestled amongst some gorgeous mid century furniture and home wares! As you know by now we left Wood Street and have a permanent concession space in this shop.
We love being there and we hope you can pop in and visit...
Here's our Christmas Window in the making...I think it deserves a visit especially at dusk so you can see it in it's fully glory...Selfridges you may be grand but our seasonal window is pretty awesome too!


Paper houses made from a template then laser cut! Check out our very fab MP Stella Creasy...I think she's pleased that she's featuring in our window installation!


two down and 100 left to fold and paste! That took some time but it was worth it!


Taking shape...paper house mobile! A series of paper houses strung on fishing wire onto a bamboo pole and proped up over the main shop window...

Love the reflection of the real houses onto the window with the floating miniature paper houses!


Light installation for the window made over an Ikea lamp...ready to add to the window to illuminate and cast some shadows. Check out the windows...looks like someone's in!

Paper cut provides the final touch and hey presto... a very simple seasonal message! Merry Christmas!!!