The bears and circus animals have settled in at Blackduke &
Cashman. You can find them nesting in between high quality hand picked
mid century furniture and amongst adorable hand made gifts! This
collaboration is one based on a love for beautiful design and tapping
in on local talent. This friendly trio -Black Duke & Cashman, Cat Boy and Craft Guerrilla- are proud to present the best of the best in
art, design and hand made goods!
Pop by on the weekend and see the exhibition which will be on until the beginning of September (from 3rd of August to 1st of September )... though please don't feed the bears!
Black Duke & Cashman/Craft Guerrilla : 83 Grove Road Walthamstow London E17 9BU
Open:
Friday 12 pm to 6pm
Saturday and Sunday 11 am to 6 pm
Or by appointment please email: info@blackdukeandcashman.com
How to get there:
Tube Victoria Line North Bound to Walthamstow Central
Train: From London Liverpool Street toward Chingford get off at Walthamstow Central
From town on the bus: 48, 56 or 55
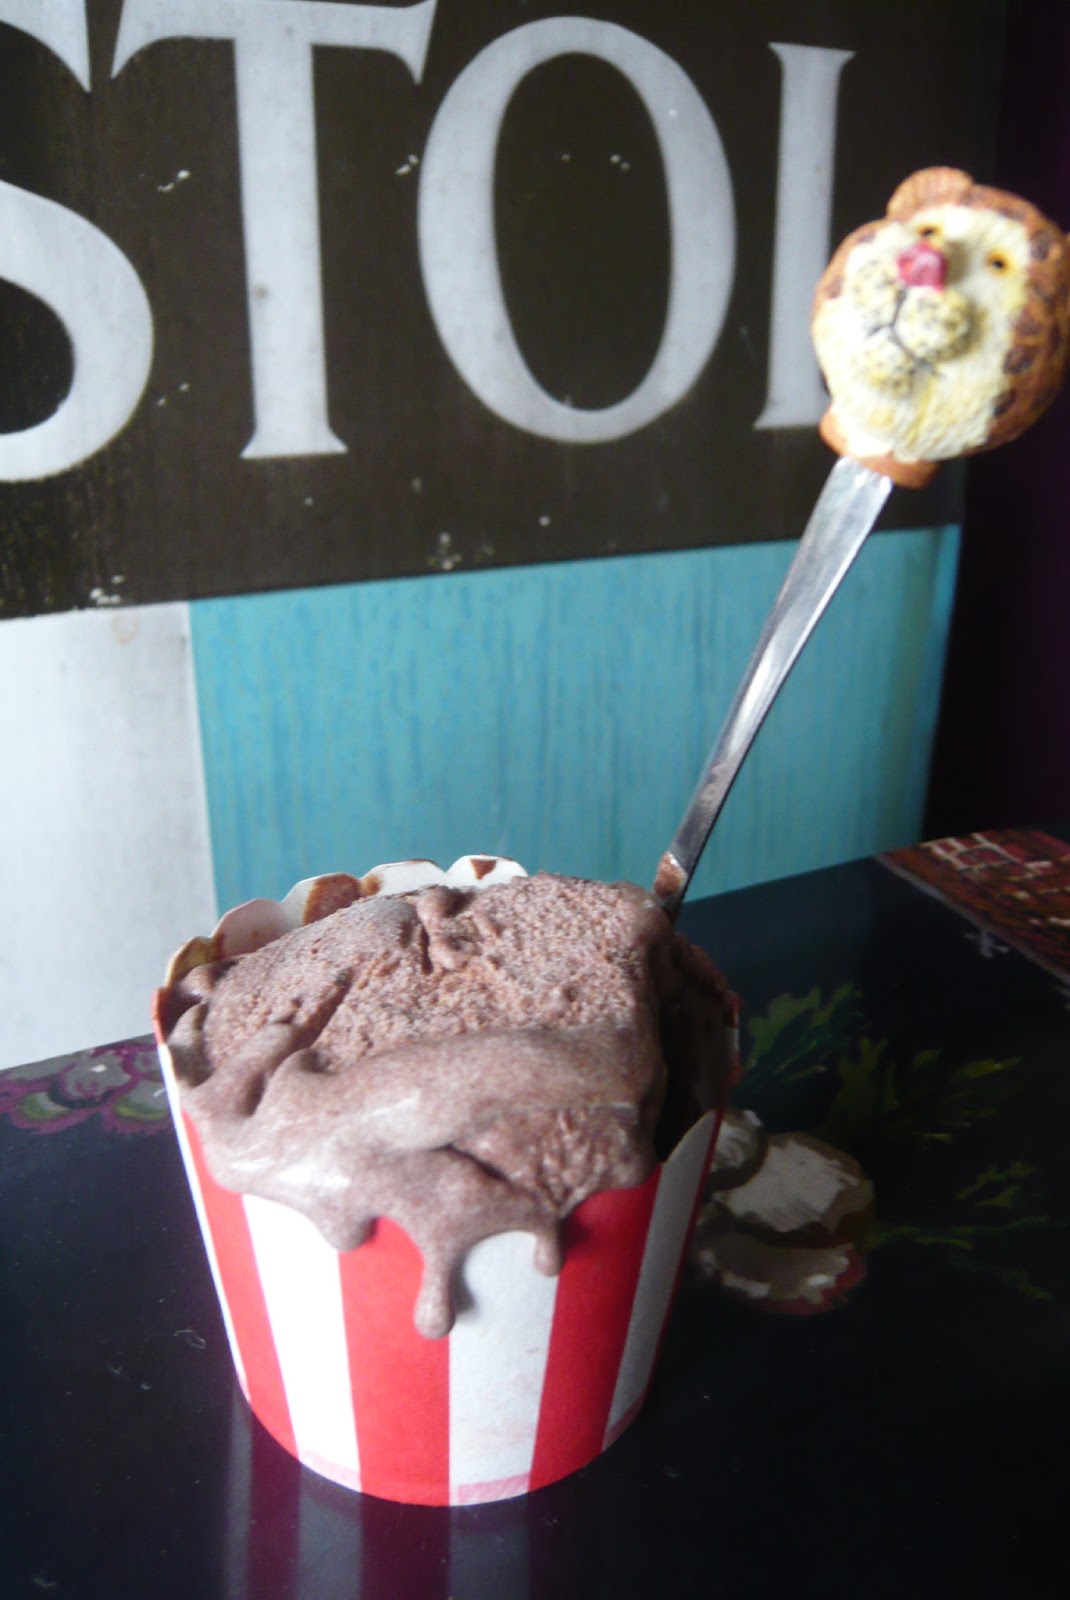
Finally the hot weather has arrived and London is prettier for it... so many gorgeous people in gorgeous summer frocks (and the boys look pretty awesome too... but not in frocks though!), it really is something quite extraordinary but the best accessory by far is some home made ice cream! But don't wear it... As I can confirm it is quite a task to remove a chocolate ice cream stain from a dress!
Because we love trying new things and as I am "babysitting" a friend's ice cream maker I thought I'd give it a go! I was thinking of trying a few fruity ones but in this household chocolate rules and so... I complied and made some super chocolaty stuff courtesy of the fab cook Hugh Fearnley-Whittingstall.
I have to say that it got a huge thumbs up! Easy to make - even though I was slightly in a flap when I read the part of making a sugar syrup but it was more straight forward then it looked - and is so delicious... it's pretty close to a certain Danish Ice cream company but...better!!!
Though to me it was super duper it needed to pass my fussiest taste tester's approval which it did, he actually said:
"Wow, it's like eating frozen chocolate mousse!"
And if the other half's happy with it then mission accomplished so I highly recommend this recipe... http://www.bbc.co.uk/food/recipes/superrichchocolateic_14295
Easy Tiger, there's enough for everyone!
Plus as I had a bit of mix left over - it wouldn't all fit in the
churner- which means the old noggin started to work overtime!
I couldn't just chuck it away so I thought about experimenting with it and as it had eggs and butter it was a perfectly good cake base so to the mix I added 2 table spoons of self raising flour. The consistency should be like that for a sponge cake mix but still quite runny.
I trialed one straight away and it was pretty good though what I found next would completely change the recipe and I can confirm that it's well worth the wait! The first trial was good... it was more of a gooey sponge cake which hey... I still ate and enjoyed immensely but take it from me be patient and it gets better!
What I found is that if you let it set in the fridge overnight that it becomes more of a souffle, chocolate fondant type of dessert and that is absolutely a winner with me!
So what you'll need to do is: fill your ramekins about 3/4 of the way, cover with clingfilm, leave over night in the fridge to set then zap in the microwave for 15 to 30 seconds (if you're making 2 at a time and you have an 800 W microwave it'll take circa 30 to 45 seconds).
Let's just say that it blows all those "cakes in a mug" recipes out of
the water... kind of reminds me of the Gü Desserts souffle pots! Warm, gooey, super dark chocolate heaven which will go
amazingly well with the above mentioned ice cream... though you might go
into a chocolate coma! Oh well... it'll be worth it!
As summer strides past it's middle... er yes, that's right, we've gone past midsummer and even though it hasn't felt all that summery... the great thing about this season is that it does throw us a few bountiful treats and if you're anything like me you'll be happy to hear that those treats can be foraged for free!
Yup, absolutely free though I do suggest that you check if anyone owns the land especially f it's not obviously public land, but everywhere I looked there were tons of elderflower trees and so I took myself up to the Walthamstow Village cemetery and began picking!
Walthamstow Village...ST Mary's Church cemetery. Great for Elderflower and blackberries too!
So this weekend get out there and get ready to make some cordial
which is an absolute summertime treat! Use it with soda water to create a
refreshing drink or drizzle onto ice cream, desserts or even in
cocktails. Yeah... that's pretty much why I made it... I do love a
cocktail and a white rum and elderflower cordial punch is something I'm
looking forward to drinking when it gets hot!!!
So here's a little recipe for you to try...
Elderflower Cordial...
prep time 40 minutes
steeping time 48 hours
ingredients:
1k /2 ¼ lbs sugar
1.5 litres / 6 cups boiling water
2 medium un-waxed lemons, washed
2 large limes, washed
30 large Elderflower heads, shake to remove any insects or dust
55g / 2 oz citric acid (available from a chemist or Wilkinson's in their home brew section)
Recipe:
Place the sugar into a large saucepan/stockpot or a large heat proof
bowl. Pour the boiling water over and stir until all the sugar has
dissolved. Leave to cool.
Grate the rind of the lemons and the limes with a fine grater, add to the sugar water.
Slice
the lemons and limes into thick slices and add to the water. Add the citric acid
and stir, then finally add the flower heads to the water and stir
again.Remove as much as the stalk as you can.
Cover with a clean cloth or lid and leave to steep for 48 hours.
Strain through clean fine muslin cloth into a clean bowl.We've used a colander with a jiffy cloth and strained it twice into a measuring jug to remove any bits.
Using a funnel, fill sterilised bottles (see note below). Seal and
store in a cool, dark place (not the refrigerator) for a few weeks or
freeze in plastic bottles to keep for longer (see note below).
Pick large heads which are in full bloom...
It's really easy to make and I for one am converted to making my own cordial now. In previous years I had thought it might be too complicated to make but as you can see from the recipe it's super easy. I'm planning on going to get some more so I can make some Elderflower Liqueur also there's another variant I want to try... I hear that if you add a couple of teaspoons of lavender flowers that it's even more yummy! Can't wait to try!!!
Doing the taste test!!! Mix with water to your own taste... we like it strong with plenty of rum though this one in the photo was just with cold spring water!
Once bottled keep your brew in a dark cool place preferably out of the fridge! We've added a brown paper label to help keep the light out...
Note:
To sterilise your bottles wash well with soapy water then dry in a medium/hot oven (gas mark 5 or 6) for about 10 minutes.
To
freeze your cordial either fill ice cube trays or if you're freezing it
in a bottle make sure to leave plenty of room as the liquid will expand
during freezing.
The best way to pick your elderflower
heads is to do it on a dry warm day as you want them to be at their
most fragrant. Also make sure they are away from any busy roads as the
elderflower tree will soak up all the nasty car fumes... yuck that's
something you really don't want to bottle and drink!
P.S. Please forage responsibly. Even though we love free stuff we're also aware that nature also needs these Elderflower to feed all the beasties who are dependent on it for food so please pick only what you need!
For so many city dwellers outside space comes at a premium and lots of them are like me... without a garden!
Being surrounded by grey, brick and mortar structures can take a lot out of a gal so finding softness and comfort is something I tend to look for inside the home through the use of soft furnishings and home wares but also in living things like plants.
BUT because of the very small issue of not having a garden - plus my window boxes have been transformed into Kitty lawns- I've been looking at alternatives. Planting has come a long way since the days of hanging baskets and people are getting more and more creative by
using large glass cloches, glass bowls or pretty ceramic bowls to create mini masterpieces.
This is something which I find pleasing and absolutely inspiring!
Think outside the window box and plant something that will give you
lots of joy but will also feed the senses. Use plants and flowers which
don't just look good but smell and feel good too.
Don't tell me you've never passed a "money tree" plant without giving the leaves a gentle squeeze? It's pure pleasure and in a way it connects me with nature. It's true! However small the gesture may seem it really does!
I
love the idea of having small indoor gardens in a container... a bit
like dioramas. I was obsessed with these as a child and had boxes under
my bed filled with scenarios usually of forests and nature landscapes... and taking a cue from that memory... I absolutely adore the little colourful cacti pictured below, nestled together, all bunched up in a herd like they've found a turquoise oasis in the hot desert. It's such a simple idea but absolutely beautiful too! Hum, I think I may just have to make my own desert diorama...
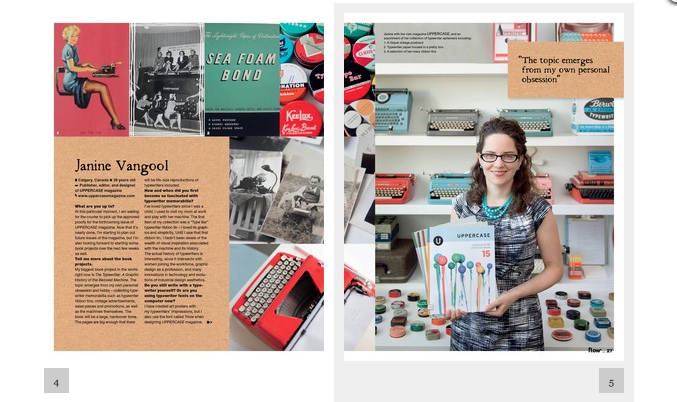
We first came across these lovely creative people through twitter and we think they should definitely be better know in the UK. "Flow" is a Dutch based creative magazine which also manages to create and sell beautiful paper goods plus their blog/website is pretty darn good too!
So what makes Flow different from all the others?
Stamps available to buy and other paper goods like diaries and wrapping paper!
There are so many Craft mags out there at the moment but what is seriously lacking is a publication which stands out both in the design stakes and the content.
After a huge dry spell of "good looking" UK craft magazines our market is now flooded with a hundred and one "Molly Makes" look-a-likes.
I do Like Molly's, don't get me wrong, but now other magazines are emulating too closely so it kind of loses it's sparkle as everything out there becomes very samey.
I
often think that the majority of craft magazines are very one
dimensional. OK so it's a craft mag, so shouldn't it be all about CRAFT making? Yes and no. I love the projects and the d.i.y. content but I
also don't see the point of a magazine packed solely with projects you can easily find on Pinterest and an endless showcasing of work spaces.
OK not everyone is a natural born crafter so I understand why all the projects but how many of these magazines can a market sustain?
Not just a note book...but a beautiful ideas note book!
What Flow manages to do is offer a magazine which is bright, inspiring and inviting without making you feel like all the people featured in the inside pages are living a dream while you fester in reality... a bit like being tormented by a fantastical cake shop which never opens though you have the munchies like no body's business so you're left tapping on the window, wishing it was you on the other side of the double glazing stuffing your face with sweet fluffy cake and not just left out in the cold looking in!
So why all the love? Flow does tap into the hand made zeitgeist yet it's done in an original way. Though it features projects, recipes, freebies and even life mantras it's definitely a marriage of the creative and the philosophical world.
You'd be forgiven for thinking that an article titled "Life is about finding the balance" would be all about offering advise on how to run a designer maker business while balancing a home life but far from it. It taps into a shared aspect -humanity- and it offers content which is open to all and not just to people working within the creative industry. That my friends is awesome... there isn't one mention of craft but it's all about living a better life as a human being and we can all relate to that!
I do like our UK magazines but sometimes I wish they would just "be themselves" rather then try too hard to be a copy of someone else.
Though Flow does subscribe to a certain aesthetic it still comes across as fresh! With a sub heading of: Simplify your life - feel connected - live mindfully- spoil yourself... It's not surprising there is such a huge worldwide following.
This is what they say about their magazine...
Flow is a magazine for women who are looking for more peace and quiet in their busy lives.
Flow offers inspiration, insights and solutions. Authentic, made with love, a magazine with lots of extras.
Each issue has four parts:
1. FEEL CONNECTED:
about family, relationships, friends, but also about the world around you.
2. SPOIL YOURSELF:
indulge yourself with pretty and fun products.
3. LIVE MINDFULLY:
living with awareness, attention for the now, mindfulness and psyche.
4. SIMPLIFY YOUR LIFE:
practical solutions to make life easier, even inside your head
We hope Flow manages to keep going in this fast paced multi media world, though I'm sure they will, and if anything we hope we've managed to turn you on to something a little bit different and exciting... so go on if you have some time this weekend go check out their blog... it's definitely worth a few hours of your time!
As I pack my bag I'm left with the feeling that I'm forgetting something... but... no, I'm definitely not forgetting anything but I am in fact having a little teeny break and so I won't be posting my usual weekly features like : "Friday's Craft Crush" and "Something for the Weekend" which serve to showcase the works of talented designers// bloggers // artists that have caught my eye.
So instead this week I'm leaving you with a taster of what's to come...
Craft Guerrilla IE me will be chasing the craft dragon* in the beautiful city of Porto! (*side note: If you've been to Porto you'll probably know that the dragon is the city's emblem... and alsothe mascot of F.C. Porto - world famous footie club!!!)
Filled with beautiful monuments, art-nouveau architecture, picturesque and folksy citizens what this gem of a city has by the bucket loads are amazing haberdashery shops, fabric shops and a massive amount of vintage finds still to be discovered by the everyday savvy tourist... plus there's also a shop or two which sell and make the most amazing designer maker goods too!
And how come I know about them you ask? Oh well, lets just say that Porto is the birth place of a very young Craft Guerrilla and the spiritual home of her crafty creations.
I studied ceramics at "Escola De Arts Soares dos Reis", a then well know art school, passed most of my summers there and I even learnt most of my craft skills in this fair city with my grannies.
In the late 1980's I studied and specialized in "Azuleijos" - hand painted ceramic tiles... like the ones in the photo below - so this place has a very special space in my heart!
It's not just the home of some serious craft either but of renown hand made industry like "Ach Brito" (soap company) and "Fabrica do Carvalhinho" (a world famous ceramics factory) but it's also a modern and vibrant city with a wealth of history, culture and art... plus some serious club nights though I fear I'm not as young as I used to be for that! Dancing all night, surely not?!
So expect a few bits of crafty treasure (oh yes, I will be opening my little black book and sharing a few addresses with you...but only if you're nice and promise not to share!) and lots of sun filled photos of us in Porto... you might even see us hosting a workshop! You know what it's like...we just can't have a proper break as our hands need to be in a state of constant making!!!
Unlike me you might have a proper weekend so here's a fab little blog which you may enjoy trawling through at your leisure...
Packed to the rim with the best craft projects on the net, fun and easy tutorials, quirky links to stuff like smart phone wallpaper and it even features a host of copyright free images/art work which you can use in your projects.
Run by "Bolacha Maria" - she is an enigma but a very crafty enigma none the less - what this blog does is take the best of the best and collates it all in one easy to browse blog. Even if you can't read Portuguese it really doesn't matter... follow the pictures and be prepared to make!
We met Cat and her partner Tom about 4 years ago and what struck us was the energy and enthusiasm they both shared for craft. I'm happy to say that that energy and enthusiasm is still going strong and so is their beautifully web site Cut Out & Keep - a dynamic and cool craft website with tons of stuff you'll want to make!
Filled with amazing tutorials, great articles and features as well as a friendly and thriving user community... plus it's free to join! We are very big fans and we hope you will become one too...
so if you fancy getting your hands busy this weekend then take a look at Cut Out & Keep... but beware - you will spend a lot of time on there!
Or you can follow the step by step instructions here:
Chalkboard Bunting
Rewritable bunting for every occasion!
I've been obsessed with
chalkboard paint recently and when trying to come up with a fun
decoration for our bookcase, the idea of chalkboard bunting came to
mind! It's perfect because I can change the message from Happy Birthday
to Merry Christmas, depending on the season or our mood...
You will need:
Thin Wood
Chalkboard paint
A paintbrush
String
Hole punch
Chalk
Step 1:
Start by cutting triangles out of thin wood. We used some scrap shipping
wood that came as packaging with a piece of furniture. You can buy wood
triangles in craft shops, if you struggle to find a piece that works
well. You'll need about 12 triangles to be able to write a nice long
message.
Step 2:
Paint your triangles with a coat of chalkboard paint and leave to dry.
Step 3:
Paint with a second coat of paint and leave to dry again.
Step 4:
Punch a hole at either side of the top of the triangle. My wood was thin enough to use a hole punch.
Step 5:
Loop some string through the hole.
Step 6:
Secure at the back with a knot and then string through the second hole, securing with another knot.
Step 7:
Leave a small length of string between each triangle and continue threading them all on to the string.
Step 8:
Now the fun part. Write on your bunting with chalk. I used a
ruler to give mine a neat outline, but you can decorate yours however
you like!
And you’re done! Hang up and admire your handy work!
Here's the bunting in action the new Cut Out & Keep Google video:
As Spring seems to be on it's way this weekend we'll be looking at ways of getting our green fingers busy!
We love gardening though as city dwellers we are like many others - without access to a garden -
and so we're always on the look out for alternative ways of getting back in touch with mother earth. And because we are very much city kids we like to do things a little bit more "urban"!
Moss graffiti is a better alternative to traditional graffiti, though I am a fan I feel that nasty chemicals in paint are not very Eco friendly so that's a big no no for me! Having dabbled in the late 1980's I loved the artistic freedom that came with graffiti. As many artists experiment with new ideas I think this one is definitely one which is open to lots of growth and with any luck it will spread through (boom boom, sorry but it had to be done!) towns and cities adding more greenery, beautiful public wall art and much needed oxygen.
If you'd like to find out how to then follow these easy step by step instructions:
You can also substitute with yogurt (vegan yogurt can be used)
2 cups of water
1/2 tsp. sugar
Corn syrup (optional)
1- Gather up as much moss as you can find or buy.
2- Wash the moss to get as much soil out of the roots as possible.
3- Break the moss apart into manageable pieces and place in blender.
4- Add the buttermilk/yogurt, water/beer and sugar. Blend the mixture until completely smooth. You'll want it to have a paint-like texture.
If the mixture is at a consistency where you feel it will drip, add corn syrup until the consistency you desire is reached.
5- Use a paintbrush to apply the moss-paint to the surface on which you wish your design to grow.
6- If possible, check back weekly to either spray the
design with water (to encourage moss growth, especially if you live in a
dry environment) or apply more moss-paint.
As you probably know we love illustration just as much as making and baking! It's another one of our passions and because of it we're always on the hunt for new talent though this time it came to us...
I am so proud to have been immortalised by this lady and absolutely love the portrait she drew of me.
Craft Guerrilla by Bex Shaw
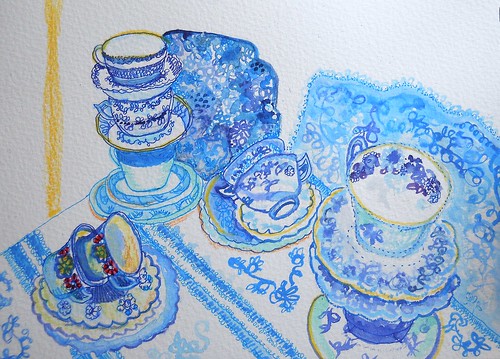
Bex captures everyday situations and transforms them with water colours, pen and ink in such a way that her subjects seems to reside in another era... her drawings are quite dreamlike and always make me smile!
Blue and white china...
Windows filled with cakes, blue and white china cups, pretty dresses, book filled cases, sweetly whiskered cats, musicians and jazz dancers... all exquisitely drawn and alive on the pages of her drawing pad.
You can usually find Bex Shaw at Clerkenwell Vintage Fair capturing the souls and hearts of many visitors at her little table near the ballroom entrance door. If you do see her make sure to smile, she might just think you a worthy subject and add you to her collection!
So if you're looking for something to brighten even the drabbest of weekends, let's face it...we've had a few recently, then get you peepers onto her Flickr site and prepare to be delighted: http://www.flickr.com/photos/bexshaw/
Craft Guerrilla gals (and guys) love to bake! It's a creative outlet so it's very much a weekly happening in CG Towers... plus we are pretty greedy too!
Mostly we are kept busy with crafting but we definitely always find time to bake! It's amazingly relaxing and also you can eat what you make which isn't possible with craft...ew, woolly pompoms are not tasty!
For Easter we've decided to try to bake our own Frenchbrioche loaf. Yummy, soft, sweet and heavenly servedwith lots of butter and jam...the perfect Easter weekend breakfast though we advise you to eat it as often as you like and not just for Easter! Somethings should be enjoyed more then once a year!!!
Having never attempted to make brioche we began with mild trepidation though with the aide of a bread machine it was simple and super quick! There are so many myths about brioche making but after trying this recipe I can truly say, hand on heart, that it isn't that difficult. It takes a little time but all good things do so... Try it, you won't be disappointed.
Place ingredients inyour bread machinein the following order: milk, creme fraiche, eggs, salt, sugar,rum,orange blossom water andvanilla extract. Cover withflour.Dissolve the yeastin atablespoons of waterand pour overthe flour. Start your machine on the dough program. All machines vary time wise so please refer to your handbook to check the timings of your dough cycle as you'll need to add the butter half way through. Once your machine is half way through the kneading cycle add the cubed butter which should be cut in smallish cubes. Add a tablespoon at a time so the machine can kneed it into the already mixed dough. At the endof the program, remove the doughfrom the machine anddivide it into two.(NOTE: You
can do this by hand too once the dough cycle reaches the end. If you are
doing it by hand knead just so the butter is evenly marbled through the
dough but don't over knead it. You should be able to still see chunks of
butter in your dough.)
Form twobraidsand arrange on abaking sheetcovered withparchment paper.Let rise for about 2 hours. Preheat oven to 180 °C.Brush loaveswith beaten egg. Bake for about 25minutes. *TIP: we used two silicone loaf molds just so to keep them tidy but you can bake them straight onto a floured oven tray!
Even though the weather's not playing fair we're feeling pretty spring like. It's late March and we're fed up of grey. It seems to be enveloping everything around us so I think it's high time we brought some colour indoors!
This cute tutorial shows you just how you can make your very own pretty flowers even if the weather's not helping us by bringing budding blooms to our gardens... so there mother nature this weekend we are making our own!
We are totally in love with this Parisian lady and her beautifully chic blog: "Make my lemonade"
Lisa Gachet's offerings are a heady and pretty mix of recipes, craft projects, beauty, fashion looks and lots of pretty photos. It's like Paris in a BLOG!
You'll be trawling through the posts with quite a few assuring "hmmmm"s and "haaaaa"s on your lips with a lot of "Oooh la la"s thrown in for good measure... The only draw back is that it's written in French.
Well we guerrillas are fluent in a few languages including French: "Mes qui, c'est pas mal mon Française" but for those who don't speak the lingo you won't be disappointed.
lovely crafty ideas for you to make...
a cute step by step tutorial...
Lots of great posts including beauty product reviews!
There'salwaysgoogle translate plus the photography is amazing in itself and that'll keep you hooked for hours on end plus the tutorials are photographed in a "step by step" method so very easy to follow. You'll love it et ça c'est une promesse!!!
*Lisa's blog reminds us of cycling through Paris in the height of summer wearing a fluttering tea dress and Audrey shades. Our bicycle basket is filled with pain au chocolate, cheese, jam, fruit and a pretty bunch of daisies!*
We love blogs which showcase the works and musings of many. Run by creative professionals from the UK, Australia and the Middle
East, "Jackie Magpie" is dedicated to the pursuit of visual, creative
loveliness in all its forms.
You might even recognize one of their writers Kate Forrester, well I mean you might have seen her work as she's a very busy illustrator.
Absolute Press produced a luxury, hard-back, ‘coffee table’ book, dedicated to the delights (and horrors) of Marmite. Illustrated by Kate Forrester
The mix of posts and beautiful, sumptuous imagery is always a treat which will make a wonderful and varied read. It will happily take you through the weekend...and if you're feeling the mid week blues it will carry you through until Friday with gorgeously shot photos, interesting articles, reviews, interviews and the promise of finding something inspirational!
Book reviews include: The Bathing Women by Tie Ning (Blue Door Books)
Jackie Mag Pie a blog which is pretty and also a great read!
We're definitely going to read Jackie Magpie over breakfast this weekend though I'm finding it hard to not peep until Saturday morning! Some things you really should save but then again...you can't get enough of a good thing!